How to run a Claude Code skill on any machine
One command installs a registry skill on every machine you use, into each agent's own directory, verified against the publisher's SHA-256 tree hash.
One command puts a skill on every machine you use: npx skills add https://api.skillsafe.ai/{ns}/{name}. Vercel Labs’ open-source skills CLI clones it over git, writes it into each installed agent’s directory, and the files are verified against the publisher’s SHA-256 tree hash. Nothing is copied by hand, so nothing drifts.
Updated September 2026: commands verified against the MIT-licensed skills CLI (31,875 GitHub stars, 2,723 forks) and the 30,423 skills published in the SkillSafe registry.
You built a skill with your agent — a repetitive task, captured once so it’s done correctly every time. Now you want it on your laptop, your desktop, the box you SSH into, and your teammates’ machines. Nothing in the agent tools does this for you. Anthropic’s Agent Skills documentation is explicit about it:
Custom Skills do not sync across surfaces. Skills uploaded to one surface are not automatically available on others.
— Anthropic, Agent Skills documentation
The instinct is to git clone it around and symlink. That works until the day the skill drifts on one machine and you can’t tell which copy is right. A registry solves exactly this: one canonical version, installed the same way everywhere, with a hash to prove nothing changed in transit.
Where a skill actually lands
A skill is a folder — a SKILL.md plus whatever it ships alongside — which is why installing one is a file copy rather than a running process, unlike an MCP server. npx skills add detects which agents you have installed and writes the skill into each one’s own directory. The CLI’s README lists Claude Code, Codex, Cursor, OpenCode “and 75 more” — 79 agents in total — with a project path and a global path for each:
| Agent | Project path (default) | Global path (-g) |
|---|---|---|
| Claude Code | .claude/skills/ | ~/.claude/skills/ |
| Cursor | .agents/skills/ | ~/.cursor/skills/ |
| Codex | .agents/skills/ | ~/.codex/skills/ |
| Windsurf | .windsurf/skills/ | ~/.codeium/windsurf/skills/ |
| Gemini CLI | .agents/skills/ | ~/.gemini/skills/ |
| OpenCode | .agents/skills/ | ~/.config/opencode/skills/ |
Source: the supported agents table in the skills README. Claude Code’s two paths match Anthropic’s own documentation, which puts personal Skills in ~/.claude/skills/ and project Skills in .claude/skills/.
That distinction is the one decision worth making up front. Project scope (the default) puts the skill in the repository, where it is committed and shared with everyone who clones it. Global scope (-g) puts it in your home directory, where it follows you across every project on that machine. A skill your whole team needs for one codebase belongs in project scope; a skill that is yours belongs in global scope on each of your machines.
Install it anywhere with one command
Every SkillSafe skill is cloneable over git, so the skills CLI installs it natively — the full npx skills add reference covers every source format and flag it accepts:
npx skills add https://api.skillsafe.ai/@your-ns/your-skillOn install, the files are verified against the publisher’s tree hash — a SHA-256 over the file manifest, a 64-character hex digest — so a tampered mirror can’t slip a modified skill past you. When the CLI installs to more than one agent it offers 2 methods: symlink (recommended) points every agent at one canonical copy, and copy makes independent copies for agents where symlinks don’t work. Symlinks are what stop one skill installed into several agent directories from becoming several copies that drift apart.
The CLI also caps what it will pull from a direct download URL: 10 MiB downloaded, 25 MiB extracted, 1000 files per archive. Those limits exist because an install is code execution by another name — see what a malicious skill can do for why that matters.
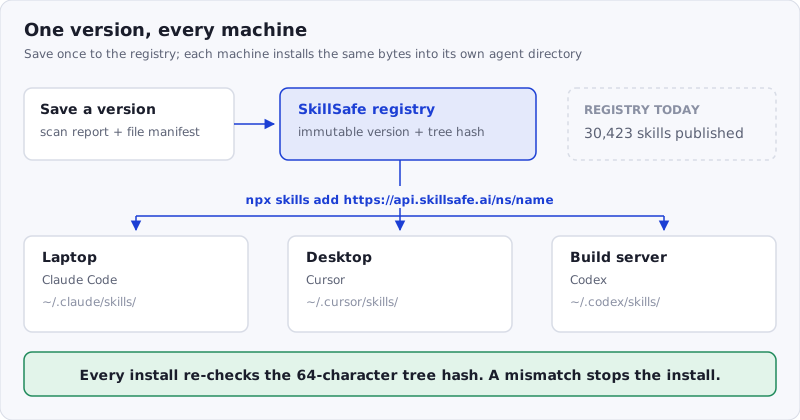
Figure: one immutable version in the registry, one command per machine, and a hash check on every install. There is no per-machine copy to drift.
That’s the manual path. It’s fine for one skill on one machine. It stops scaling the moment you have 5 skills across 3 machines and a teammate asking “which version are you on?”
Make it reproducible with a checked-in list
Put the install commands a project needs in a script that lives with the project:
#!/usr/bin/env bash
# scripts/skills.sh — every machine runs the same list
npx skills add https://api.skillsafe.ai/your-ns/pdf-extract
npx skills add https://api.skillsafe.ai/vercel-labs/find-skills
Commit it, and a new laptop or a new hire is one command away from the same setup. The registry serves each skill’s current version, and every version is immutable and scanned, so “which version are you on?” has an answer you can read off the skill’s page. When you want to move everyone forward, you save a new version — there is no per-machine state to drift.
To pull the latest of everything already installed, the CLI has its own command:
npx skills update          # all skills, interactive scope prompt
npx skills update -g -y    # global scope only, no prompt
npx skills list            # what is installed, and where
Publishing your own skill
If the skill is yours and not yet in the registry, save it. The web flow starts at skillsafe.ai/scan/; an agent does the same over HTTP — POST /v1/scan/files to scan the folder, then POST /v1/skills/@{ns}/{name} to save a version. The save hashes the files, records the scan report, and stores a private version.
The skill is private when you save it. To install it on your own other machines, use the desktop app signed in to the same account, or fetch it over HTTP with your API key (GET /v1/skills/@you/my-skill/download/{version}) — the registry serves you your own private skill. An anonymous npx skills add can only reach public or shared skills. Sharing it with other people is a separate, deliberate step — a share link on the version (POST /v1/skills/@you/my-skill/versions/{version}/share, or make it public to list it) — which is the subject of the next post.
Keep the skill itself small while you’re at it. Anthropic’s authoring guidance puts a hard ceiling of 64 characters on the name field and 1,024 on description, and recommends keeping the SKILL.md body under 500 lines — only the name and description, roughly 100 tokens per skill, are loaded at startup, so a skill you install on every machine costs almost nothing until it fires.
For agents: it’s all HTTP
There is no CLI to install. Every step above is a documented endpoint — POST /v1/scan/files, POST /v1/skills/{ns}/{name}/negotiate for a delta upload, the save endpoint, GET /v1/blobs/{hash} to fetch each file. An agent that can’t run npm has the same capabilities over plain HTTP; the full API reference documents the whole path. That matters because the agent that built the skill with you can also be the one that publishes and installs it — no context-switch to a human.
Frequently Asked Questions
Do Claude Code skills sync between machines automatically?
No. Anthropic’s documentation states that “Custom Skills do not sync across surfaces” — a skill in ~/.claude/skills/ on one machine is invisible to Claude Code on another, and to claude.ai and the API. Syncing is something you add: a registry plus npx skills add, or a dotfiles repo you maintain by hand.
How do I install a Claude Code skill from GitHub?
npx skills add owner/repo takes GitHub shorthand, a full GitHub URL, a path to one skill inside a repo, a GitLab or Azure Repos URL, any git URL, or a local path. It uses your existing git credentials, so private repositories work with the same command. Every SkillSafe skill is a git endpoint, which is why npx skills add https://api.skillsafe.ai/{ns}/{name} works with no SkillSafe-specific tooling.
Does npx skills add work with Cursor and Windsurf?
Yes. The CLI supports 79 agents, writing to .agents/skills/ or ~/.cursor/skills/ for Cursor and .windsurf/skills/ or ~/.codeium/windsurf/skills/ for Windsurf. It detects what you have installed and asks which targets to write to; -a cursor -a claude-code picks them explicitly, and --all skips the prompts entirely.
How do I update a skill on every machine?
Run npx skills update on each machine — it re-resolves each installed skill against its source and pulls the current version. Because the registry holds one immutable version per release, every machine converges on the same bytes and the same 64-character tree hash. npx skills list shows what is installed and in which scope before you change anything.
Can I install a private skill on my other machines?
Yes, with your own credentials. A saved skill is private by default; an anonymous npx skills add reaches only public or shared skills. Sign in to the desktop app on the second machine, or call GET /v1/skills/@you/my-skill/download/{version} with your API key. Sharing it with other people is a separate step that creates a revocable link.
Run it on your machines with the registry. When you need it to reach people who don’t have an agent, that’s when a skill becomes something else — an app — and we cover that separately.
More ways to run a skill: shared with no install · on a schedule · in a browser · browse the registry